
ASP NetMVC Core Deploy Include Static Contents
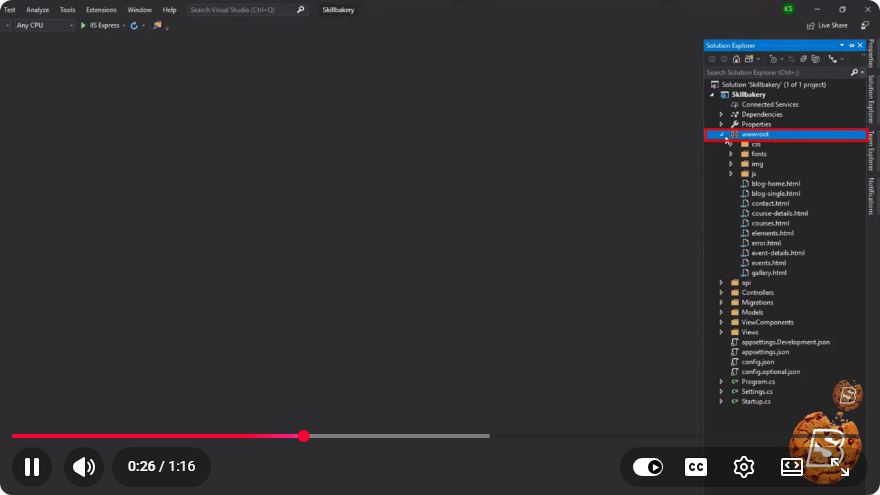
Deploying ASP.NET Core MVC with Static Content
Deploying an ASP.NET Core MVC application can be a straightforward process, but ensuring that all static content, such as images, JavaScript, and CSS files, is included can sometimes be a challenge. In this tutorial, we will walk through the essential steps to deploy an ASP.NET Core MVC application while ensuring that all static files are included and served correctly.
Prerequisites
Before we begin, make sure you have the following:
- Visual Studio installed on your machine.
- An ASP.NET Core MVC application ready for deployment.
- A hosting environment to deploy your application (such as Azure, AWS, or any other web server).
Step 1: Prepare Your ASP.NET Core MVC Application
Verify Static Files Configuration
ASP.NET Core uses a middleware to serve static files. Ensure that you have the following configuration in your Startup.cs file:
public void Configure(IApplicationBuilder app, IWebHostEnvironment env)
{
    if (env.IsDevelopment())
    {
        app.UseDeveloperExceptionPage();
    }
    else
    {
        app.UseExceptionHandler("/Home/Error");
        app.UseHsts();
    }

    app.UseHttpsRedirection();
    app.UseStaticFiles(); // This line is essential for serving static files
    app.UseRouting();

    app.UseAuthorization();

    app.UseEndpoints(endpoints =>
    {
        endpoints.MapControllerRoute(
            name: "default",
            pattern: "{controller=Home}/{action=Index}/{id?}");
    });
}
Organize Your Static Files
Make sure your static files are organized in the wwwroot directory of your project. This is the default location where ASP.NET Core serves static files.
Example Directory Structure
YourProject
│
├── Controllers
│
├── Models
│
├── Views
│
├── wwwroot
│   ├── css
│   │   └── styles.css
│   ├── js
│   │   └── script.js
│   └── images
│       └── logo.png
│
└── Startup.cs
Step 2: Publish Your Application
Once your application is ready and static files are verified, the next step is to publish your application. This can be done from Visual Studio.
Publishing via Visual Studio
- Right-click on your project in the Solution Explorer.
- Select Publish.
- Choose your target (e.g., Azure, Folder, etc.) and click Next.
- Configure the settings as necessary.
- Ensure that the option to "Remove additional files at destination" is unchecked, so your static files are not deleted during the deployment.
- Click Finish and then Publish.
Publish to a Folder
If you want to publish your application to a local folder for manual deployment, follow these steps:
- In the Publish dialog, select Folder as your target.
- Choose a local path where you want to publish your application.
- Click Publish.
Your published files, including static files, will be located in the specified folder.
Step 3: Deploy to Your Hosting Environment
Deploying to Azure (Example)
If you are deploying to Azure, you can use the following steps:
- Go to the Azure Portal and create a new App Service.
- Configure the App Service settings (like runtime stack and region).
- In the App Service, navigate to the Deployment Center.
- Choose Local Git or GitHub depending on your preference.
- Follow the instructions to link your repository or deploy your folder.
Manual Upload
If you are deploying to a different server, you can upload the contents of your publish folder to the web server using FTP or any other method supported by your hosting provider.
Step 4: Verify Your Deployment
Once your application is deployed, navigate to your application URL. Make sure to check the following:
- The homepage loads correctly.
- All static files (CSS, JavaScript, images) are accessible and loading without any errors.
- Inspect the console for any 404 errors related to static files.
Conclusion
Deploying an ASP.NET Core MVC application while ensuring that all static content is included is essential for a seamless user experience. By following the steps outlined in this tutorial, you can confidently deploy your application with all necessary resources.
Feel free to reach out if you have any questions or run into issues during your deployment process! Happy coding!
Connect with SkillBakery Studios
Explore more tutorials, tools, and resources:
Posted by SkillBakery Studios


 Hello, my name is Jack Sparrow. I'm a 50 year old self-employed Pirate from the Caribbean.
No comments:
Post a Comment