
NextJs - React Framework - Dynamic Routes
Understanding Dynamic Routes in Next.js: A Comprehensive Guide
Next.js is a powerful React framework that simplifies the development of server-rendered and statically generated applications. One of its standout features is dynamic routing, which allows developers to create flexible and user-friendly applications. In this tutorial, we will explore dynamic routes in Next.js, explaining how to set them up and providing practical examples to help you master this feature.
What Are Dynamic Routes?
Dynamic routes in Next.js enable you to create pages that can change based on the URL parameters. For instance, if you have a blog application, you can create a dynamic route to display individual blog posts based on their unique identifiers (like post IDs).
Why Use Dynamic Routes?
- Flexibility: Easily create pages for varying data without needing to create a separate component for each.
- SEO-friendly: Next.js handles server-side rendering, which can improve SEO for dynamic content.
- Simplifies Code: Reduces the complexity of managing multiple static routes.
Setting Up Dynamic Routes
To create dynamic routes in Next.js, you need to leverage the file-based routing system. Let's walk through the steps to set up a dynamic route.
Step 1: Create a New Next.js Application
If you haven't already, start by creating a new Next.js application. Open your terminal and run:
npx create-next-app@latest my-next-app
cd my-next-app
Step 2: Create a Dynamic Route
In your Next.js application, navigate to the pages directory. Here, you can create a new folder that will contain your dynamic routes. For this example, let’s create a folder named posts and a dynamic route file named [id].js.
mkdir pages/posts
touch pages/posts/[id].js
The brackets ([id]) indicate that this is a dynamic segment of the URL. In this case, id could be replaced with any value representing a blog post.
Step 3: Implement the Dynamic Route Logic
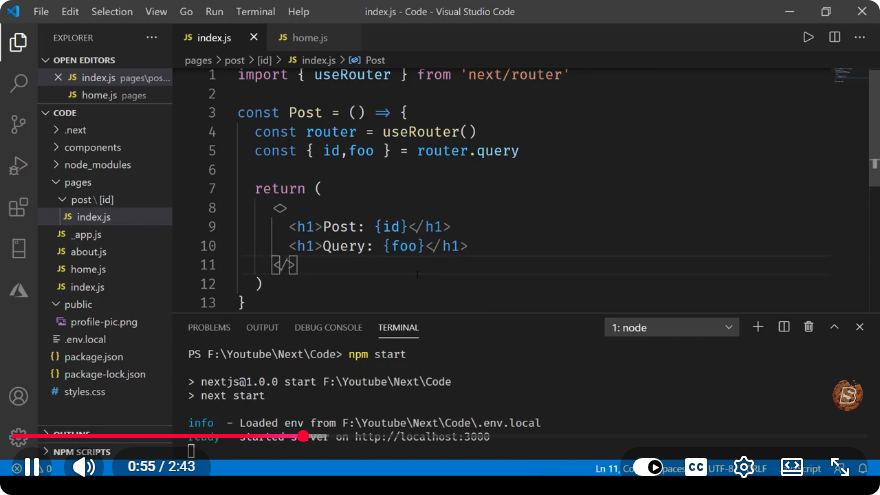
Now, let's add some code to pages/posts/[id].js. This file will handle the rendering of the post based on the id parameter.
// pages/posts/[id].js
import { useRouter } from 'next/router';

const Post = () => {
    const router = useRouter();
    const { id } = router.query; // Get the dynamic parameter from the URL

    return (
        <div>
            <h1>Post ID: {id}</h1>
            <p>This is the content of the post with ID: {id}</p>
        </div>
    );
};

export default Post;
In this code:
- We import
useRouterfromnext/routerto access the router object. - We extract the
idparameter from the URL usingrouter.query.
Step 4: Test Your Dynamic Route
To see your dynamic route in action, start your Next.js development server:
npm run dev
Now, navigate to http://localhost:3000/posts/1 in your browser. You should see:
Post ID: 1
This is the content of the post with ID: 1
Try changing the URL to http://localhost:3000/posts/2, and you will see similar content reflecting the new post ID.
Fetching Data for Dynamic Routes
In a real-world scenario, you would likely want to fetch data for the specific post based on the ID. You can achieve this using Next.js's getStaticProps or getServerSideProps.
Example with getStaticProps
Here’s how to fetch data using getStaticProps and getStaticPaths:
// pages/posts/[id].js
import { useRouter } from 'next/router';

export async function getStaticPaths() {
    const paths = [{ params: { id: '1' } }, { params: { id: '2' } }];
    return { paths, fallback: false };
}

export async function getStaticProps({ params }) {
    const { id } = params;
    // Fetch your data here (e.g., from an API or database)
    return { props: { post: { id, content: `Content for post ${id}` } } };
}

const Post = ({ post }) => {
    const router = useRouter();
    return (
        <div>
            <h1>Post ID: {post.id}</h1>
            <p>{post.content}</p>
        </div>
    );
};

export default Post;
Explanation
- getStaticPaths: This function generates the paths that should be statically generated at build time. In this example, we are hardcoding two paths for demonstration.
- getStaticProps: This function fetches the data based on the dynamic parameter (
id) and passes it as props to thePostcomponent.
Conclusion
Dynamic routing in Next.js is a powerful feature that can significantly enhance the scalability and flexibility of your web applications. By following the steps outlined in this tutorial, you should now have a solid understanding of how to set up dynamic routes, fetch data, and render pages based on URL parameters.
Feel free to experiment with different data sources and expand upon this basic framework to create a rich, dynamic application. Happy coding!
Connect with SkillBakery Studios
Explore more tutorials, tools, and resources:
Posted by SkillBakery Studios


 Hello, my name is Jack Sparrow. I'm a 50 year old self-employed Pirate from the Caribbean.
No comments:
Post a Comment