
WordPress Multisite a popular feature of WordPress, allows you to create and run multiple websites using the same WordPress installation on your server. In non technical language you can manage several different WordPress websites from a single dashboard.However, people are sometimes unsure of how to use this feature. This guide will help to clear up questions related to what WordPress Multisite is, who needs it, and how to install it.
Let's start with the basics.
1. What Is WordPress Multisite?
WordPress Multisite is a feature that allows you to create and run multiple WordPress websites from a single WordPress dashboard. It was previously called WordPress Multi-User or WPMU. WordPress Multisite is not a new feature. It is an advanced feature on the WordPress platform that has been around since the launch of WordPress 3.0. You can use it for a variety of purposes, such as updating all of your websites with a single click or charging your subscribers to create a website on your Multisite network.
2. Key Features Of WordPress Multisite
WordPress Multisite comes with various unique features. For starters, you can run a network of blogs and websites from a single WordPress installation. It enables you to create a network of subdomains, like http://john.example.com, or directories, like http://www.example.com/john/. Alternatively, you can also have a separate domain for each website on the network. It is also easier to replicate functionality across a network of websites.
In WordPress Multisite, you can control the entire network as a Super Admin or as a regular website admin, to control only one website on the network. As a Super Admin, you control the accessibility of users who want to create an account and set up WordPress blogs or websites of their own.
A Super Admin can install new themes and plugins, make them available to the websites on the network, and also customize the themes for all websites. Another feature is the ability to create websites and online shops intended for specific languages, regions, and currencies.
Both the Super Admin and the website admin can control content. While this control extends over the entire network for a Super Admin, the website admin has the right to choose which content from the main domain gets displayed on their respective website. Plugins are also under the control of a Super Admin. However, a website admin can activate and deactivate plugins on their website if required.
3. Who Should And Shouldn’t Use WordPress Multisite?
Although WordPress Multisite offers several features, it is not always the right choice. The main concern is that the websites on a Multisite network would share the same database. In other words, you can’t back up only a single website. That’s why all of the websites on a network must belong to the same principal domain.
Let me explain with an example. A university could use WordPress Multisite to build different websites for each department, for student and faculty member blogs, and for forums. Because the websites would share their database with the university's main domain, they would be easier to manage on a Multisite network.
Likewise, banks and financial institutions with a national or global network of branches, digital publications with multiple content sections, government offices with multiple departments, hotel chains, stores with multiple outlets, e-commerce companies, and website design companies such as Wix could also use a Multisite network to their advantage.
However, a web designer couldn’t use Multisite to manage several unrelated client projects. If one of the clients decided to move their website elsewhere, it would be a problem because the website would be sharing its database with others on the network. Multisite makes it difficult to back up an individual website on the network. You would be better off using a single installation in this case.
4. Requirements For WordPress Multisite
One of the first things you will need is a web hosting service provider that can handle multiple domains in a single web hosting plan. You should also have the fundamental knowledge about how to install WordPress. It would be an added advantage if you already have a WordPress installation. However, you will need to back it up. You will also need to deactivate all of the plugins.
Make sure you have FTP access. You will need to know the basics of editing files using FTP as well. Finally, you will need to activate pretty permalinks. In other words, your URLs should look not like http://example.com/?p=2345, but like http://example.com/my-page.
5. Multisite Domain Mapping
By default, you can create additional websites on your Multisite network as subdomains or subfolders of the main website. They look like this:
subsite.network.com
or like this:
network.com/subsite
However, you might not always want this, because you will be required to create a unique domain name for each website. That's where domain mapping comes to the rescue. You can use this feature within the Multisite network to map additional websites to show as domain.com. Using domain mapping, this is what you will see:
subsite.network.com = domain.com
or:
network.com/subsite = domain.com
Prior to WordPress 4.5, you had to use a domain mapping plugin to map the additional websites. However, in version 4.5+, domain mapping is a native feature.
6. Installing And Setting Up WordPress Multisite For New And Existing Websites
First, install WordPress. After it’s installed, you will need to enable the Multisite feature. You can also enable it on your existing WordPress website. Before doing so, however, back up your website.
- Use an FTP client or the cPanel file manager to connect with your website, and open the
wp-config.phpfile for editing.
- Add the following code to your
wp-config.phpfile just before the/*:
- Now, save and upload your
wp-config.phpfile back to the server.
- That’s all!
- When setting up the Multisite network on your existing website, you will need to deactivate all plugins. Go to the “Plugins” » “Installed Plugins” page, and select all plugins. Select the “Deactivate” option from the “Bulk Actions” dropdown menu, and click “Apply”.
Next, you will need to set up the Multisite network. If you are already logged into your WordPress dashboard, refresh the page to continue with the next steps. If not, you will need to log in again.

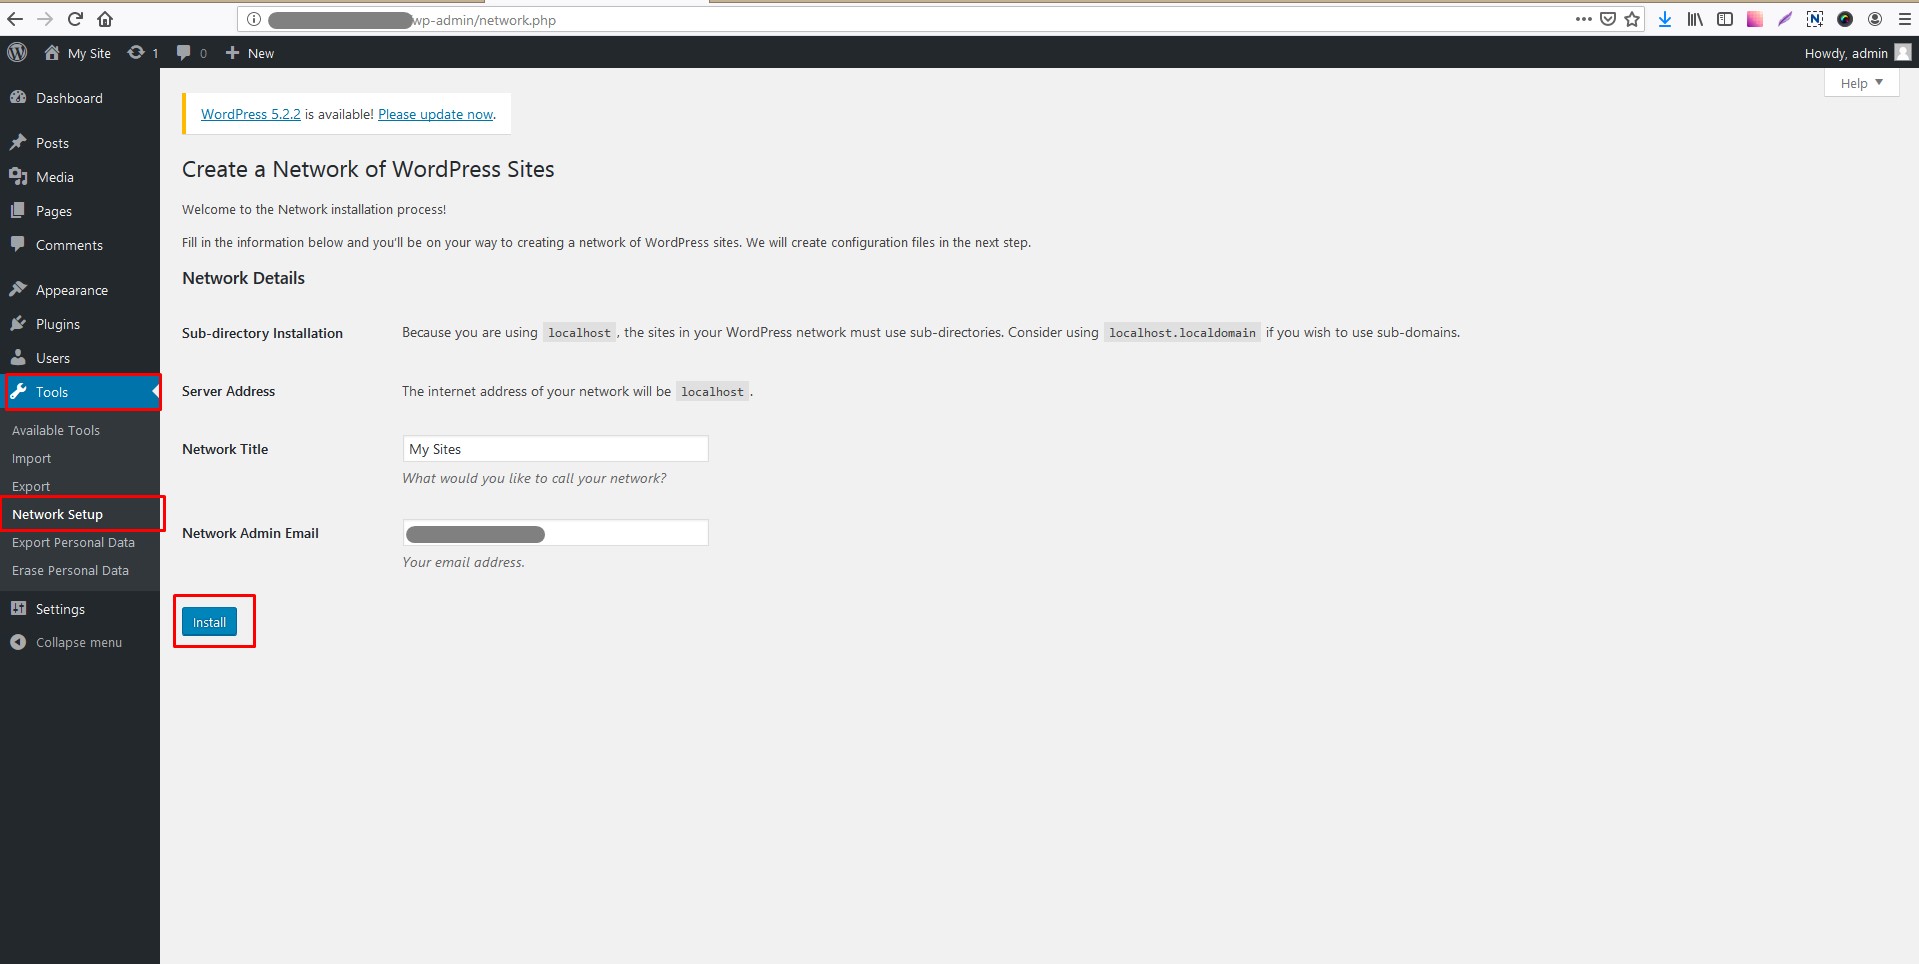
- Now, go to “Tools” » “Network Setup”. If you see a notice that you need Apache’s
mod_rewritemodule installed on your server, don't be alarmed. All leading WordPress hosting providers keep this module enabled.
- Choose the domain structure for websites on your network, either subdomains or subdirectories.
- Add a title for your network.
- Make sure that the email address for the network admin is correct.
- Click the “Install” button.
- You will see some code that you have to add to the
wp-config.phpand.htaccessfiles, respectively. Use an FTP client or the file manager in cPanel to copy and paste the code.

The set-up is complete. You will need to log in again to access your Multisite network.
7. WordPress Multisite Configuration And Other Settings
Hold on! You still need to configure the network settings, for which you will need to switch to the Multisite network dashboard.
- Open the “My Sites” menu in the admin toolbar. Click the “Network Admin” option, and then click the “Dashboard” option to go to the Multisite network dashboard.
- Click the “Settings” option in the admin sidebar. You will see your website’s title and the admin’s email address. Make sure they are correct before moving on to a few essential configuration settings.
A. REGISTRATION SETTINGS
This setting enables you to open your website to user registration and allows existing users to create new websites on your network. Check the appropriate box.
If you check the “Registration Notification” box, you will receive an email notification whenever a new user or website gets registered. Check the “Add New Users” option to enable individual website administrators to add new users to their own websites.
Use the “Limited Email Registration” option to restrict registration to a specific domain. For example, allow only users from your company to register with your website. Likewise, you can also prevent some domains from being registered.

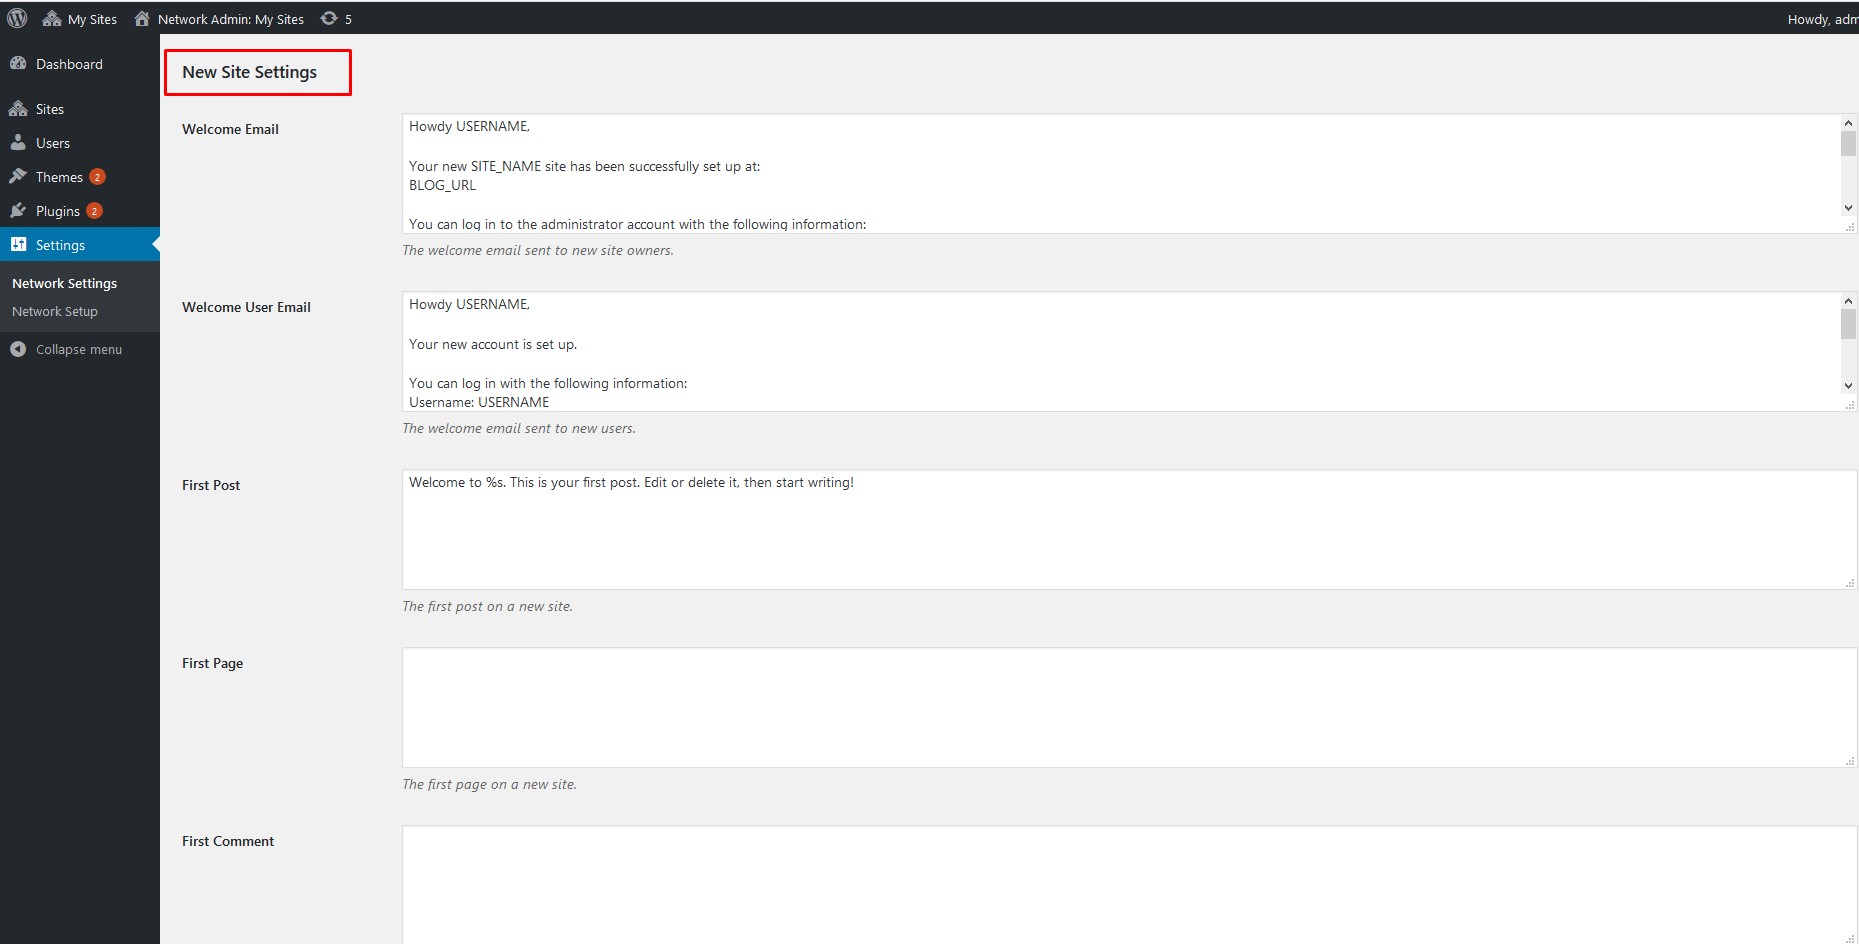
B. NEW WEBSITE’S SETTINGS
Here, you can configure the default options, such as welcome emails and the contents of the first default post, page, and comment, for every new website built on your Multisite network. You can update these settings anytime.
C. UPLOAD SETTINGS
You can limit the total amount of space each website on your network can use for uploads. This will help you to delegate server resources judiciously. The default value is 100 MB. You can also set the type of files that users can add to their websites, such as images, .doc, .docx, and .odt files, audio and video files, and PDFs. You can also set a size limit for individual files.

D. MENU SETTINGS
This setting enables the administrative menu for the plugins section of your network’s websites. Once you enable this setting, users will be able to activate and deactivate plugins, but won’t be able to add new ones. Click “Save Changes” to apply the changes you have made.
9. How To Add A New Website To The Multisite Dashboard
Go to “My Sites” » “Network Admin” » “Sites”.

Click the “Add New” button.

Fill in the following fields.
- Add the address (URL) for your new website.
- Enter your “Site Title”.
- Enter the email address of the new website’s administrator.

Click the “Add Site” button to finish the process.
As you can see, WordPress Multisite comes with several advantages. You can control and manage several websites from a single dashboard. It can certainly reduce your legwork and make your website monitoring hassle-free. Hopefully, you now have enough knowledge on installing, troubleshooting, and working with applications on a Multisite network to take the plunge.


Great explanation of WordPress Multisite! I've been considering switching from Wix to WordPress, and this makes me wonder if Multisite could be a good option for managing multiple websites for my clients. Do you have any resources or guides on using Multisite for building client websites?
ReplyDelete