
8. Creating a Virtual Device for Android Studio: Step-by-Step Guide for Running Emulated Apps
Creating a Virtual Device for Android Studio: Step-by-Step Guide for Running Emulated Apps
Emulating an Android device is an essential step for developers looking to test their applications efficiently. With Android Studio, creating a virtual device (also known as an Android Virtual Device or AVD) is straightforward. In this blog post, we will provide a step-by-step guide to help you set up an AVD and run your apps seamlessly.
Table of Contents
- Prerequisites
- Step 1: Open Android Studio
- Step 2: Access AVD Manager
- Step 3: Create a New Virtual Device
- Step 4: Choose Device Specifications
- Step 5: Select System Image
- Step 6: Configure AVD Settings
- Step 7: Launch the Virtual Device
- Conclusion
Prerequisites
Before you start, ensure you have the following:
- Android Studio installed on your computer.
- Basic knowledge of how to navigate Android Studio.
- A project opened in Android Studio.
Step 1: Open Android Studio
Start by launching Android Studio. If you have an existing project, open it. If not, you can create a new one to follow along with the steps.
Step 2: Access AVD Manager
Once you’re in Android Studio, locate the AVD Manager. You can find it through the following methods:
- Click on the Tools menu at the top, then select AVD Manager.
- Alternatively, you can click the AVD Manager icon in the toolbar, which looks like a smartphone.
This will open the AVD Manager window, where you can view existing virtual devices or create a new one.
Step 3: Create a New Virtual Device
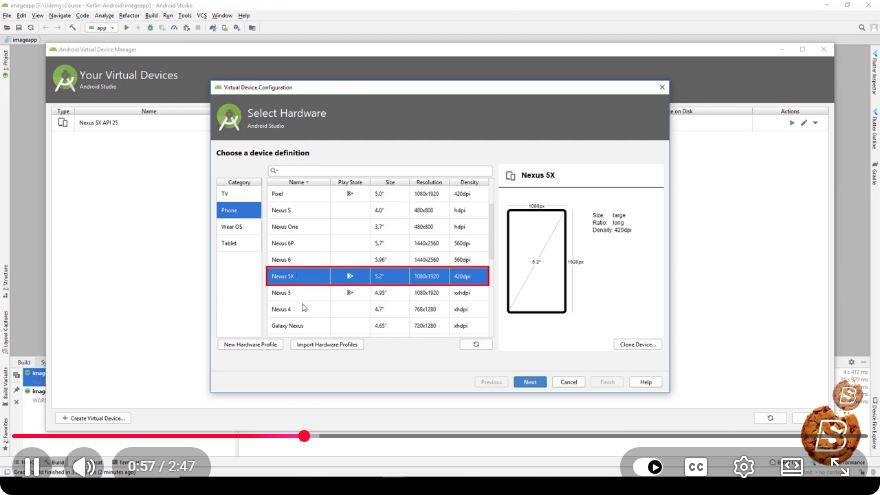
In the AVD Manager window, click on the Create Virtual Device... button. This will take you to the device selection screen, where you can choose the hardware specifications for your virtual device.
Step 4: Choose Device Specifications
You'll see a list of device categories like Phones, Tablets, Wearables, and more. Select a category that best fits your needs.
For example, if you're developing a phone application, click on the Phone category. You will see a list of available devices. Select a device from the list, such as the Pixel 4, and click Next.
Step 5: Select System Image
Next, you’ll need to select a system image for your virtual device. System images represent the Android versions that your virtual device will run.
- Choose a system image that matches the API level you want to test against.
- If you don’t see the desired image, you may need to download it by clicking on the Download link next to the version you want.
- Once you select a system image, click Next.
Step 6: Configure AVD Settings
Now, you can configure your AVD settings. Here are some essential options you can adjust:
- AVD Name: Give your virtual device a unique name.
- Orientation: Set the default orientation (portrait or landscape).
- Graphics: Choose between hardware and software graphics acceleration based on your system capabilities.
Once you're satisfied with the configurations, click Finish to create your AVD.
Step 7: Launch the Virtual Device
With your AVD created, it will appear in the AVD Manager. To launch it, click the Play button (green triangle) next to your virtual device name.
The emulator will start, and it may take a few moments to boot up. Once fully loaded, you can install and run your Android applications on this virtual device as if they were running on a real device.
Conclusion
Creating a virtual device in Android Studio is a crucial step in the app development process. By following this guide, you can efficiently set up an AVD and test your applications without needing physical devices. With practice, this process will become second nature, allowing you to focus on building great apps. Happy coding!
Connect with SkillBakery Studios
Explore more tutorials, tools, and resources:
Posted by SkillBakery Studios


 Hello, my name is Jack Sparrow. I'm a 50 year old self-employed Pirate from the Caribbean.
No comments:
Post a Comment