
ReactJS: Flux Architecture Code Demo - Web Development
Understanding Flux Architecture in ReactJS: A Code Demo
In the world of modern web development, managing the state of applications effectively is crucial. ReactJS, a popular JavaScript library for building user interfaces, often utilizes Flux architecture to handle its data flow. In this blog post, we will explore the Flux architecture and walk through a code demo that demonstrates how it works in a React application.
What is Flux Architecture?
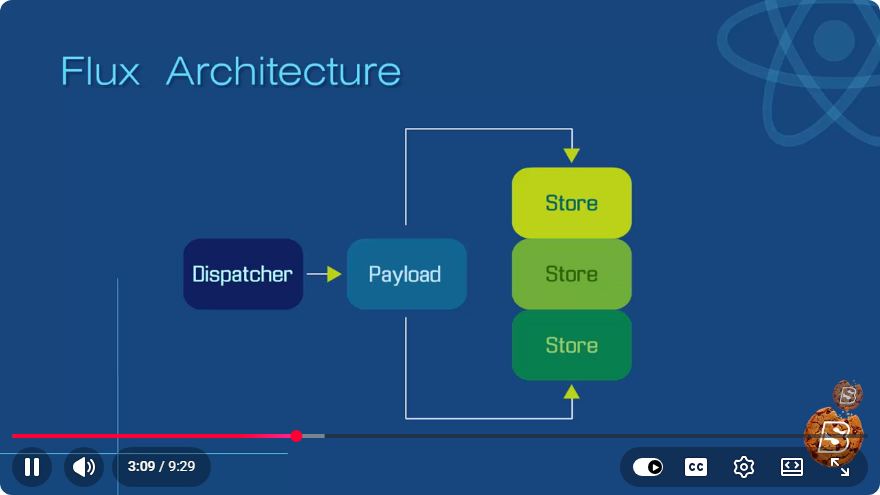
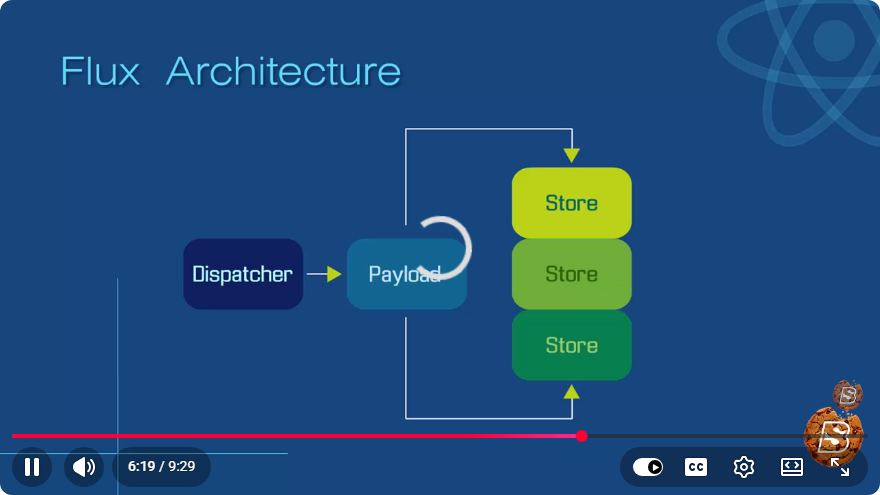
Flux is an architectural pattern developed by Facebook for building client-side web applications. It promotes a unidirectional data flow, which simplifies the management of state and enhances application scalability. The core components of Flux architecture include:
Actions: These are simple objects that contain a type and any additional data. They are dispatched to modify the application's state.
Dispatcher: This is a central hub that manages all data flow in the application. It receives actions and forwards them to the appropriate stores.
Stores: These hold the application state and respond to actions. Stores can emit change events to notify views when the state changes.
Views: In React, components serve as views. They listen for changes in the stores and re-render when necessary.
Setting Up the Demo
To illustrate the Flux architecture, we will create a simple React application that allows users to add items to a list. We will build the following components:
- Action: To add items
- Dispatcher: To handle action dispatching
- Store: To manage the items list
- View: To display and interact with the list
Step 1: Create the Project
First, set up a new React project using Create React App:
npx create-react-app flux-demo
cd flux-demo
Step 2: Implementing the Dispatcher
Create a new file named dispatcher.js in the src directory. This file will define our dispatcher:
// src/dispatcher.js
import { Dispatcher } from 'flux';

const AppDispatcher = new Dispatcher();
export default AppDispatcher;
Step 3: Defining Actions
Next, create an actions.js file in the src directory to define our actions. We will create an action to add items:
// src/actions.js
import AppDispatcher from './dispatcher';

const Actions = {
  addItem(item) {
    AppDispatcher.dispatch({
      type: 'ADD_ITEM',
      payload: item,
    });
  },
};

export default Actions;
Step 4: Creating the Store
Now, let’s create a store that will manage our items list. Create a file called store.js:
// src/store.js
import { EventEmitter } from 'events';
import AppDispatcher from './dispatcher';

class ItemStore extends EventEmitter {
  constructor() {
    super();
    this.items = [];
  }

  getItems() {
    return this.items;
  }

  addItem(item) {
    this.items.push(item);
    this.emit('change');
  }

  handleActions(action) {
    switch (action.type) {
      case 'ADD_ITEM':
        this.addItem(action.payload);
        break;
      default:
        break;
    }
  }
}

const itemStore = new ItemStore();
AppDispatcher.register(itemStore.handleActions.bind(itemStore));
export default itemStore;
Step 5: Building the View
Lastly, let’s create a simple view to interact with our store. Open src/App.js and modify it as follows:
// src/App.js
import React, { useEffect, useState } from 'react';
import itemStore from './store';
import Actions from './actions';

function App() {
  const [items, setItems] = useState(itemStore.getItems());
  const [inputValue, setInputValue] = useState('');

  useEffect(() => {
    const handleStoreChange = () => {
      setItems(itemStore.getItems());
    };

    itemStore.on('change', handleStoreChange);
    return () => {
      itemStore.removeListener('change', handleStoreChange);
    };
  }, []);

  const addItem = () => {
    if (inputValue) {
      Actions.addItem(inputValue);
      setInputValue('');
    }
  };

  return (
    <div>
      <h1>Flux Item List</h1>
      <input
        type="text"
        value={inputValue}
        onChange={(e) => setInputValue(e.target.value)}
      />
      <button onClick={addItem}>Add Item</button>
      <ul>
        {items.map((item, index) => (
          <li key={index}>{item}</li>
        ))}
      </ul>
    </div>
  );
}

export default App;
Step 6: Running the Application
To see the Flux architecture in action, start your application:
npm start
You should now be able to add items to your list using the input field, with each item being managed by the Flux architecture.
Conclusion
In this tutorial, we covered the basics of Flux architecture and demonstrated how to implement it in a React application. By utilizing actions, a dispatcher, stores, and views, we established a clear unidirectional data flow that simplifies state management.
Understanding Flux is essential for building scalable and maintainable applications, especially as they grow in complexity. As you continue your React journey, consider exploring more advanced state management solutions like Redux, which builds upon the principles of Flux.
Happy coding!
Connect with SkillBakery Studios
Explore more tutorials, tools, and resources:
Posted by SkillBakery Studios


No comments:
Post a Comment