
Developing Web App using React Cosmos DB - Install NodeJS and React
Developing a Web App Using React and Cosmos DB
In this blog post, we will walk you through the essential steps to set up a web application using React and Azure Cosmos DB. We'll focus on installing Node.js and setting up a React project, all within a concise timeframe. This tutorial is designed for developers who are eager to dive into web app development with modern technologies.
Prerequisites
Before we get started, ensure you have the following:
- A computer with internet access.
- Basic understanding of JavaScript and web development concepts.
- A code editor (e.g., Visual Studio Code) installed.
Step 1: Installing Node.js
Node.js is a JavaScript runtime that allows you to run JavaScript on the server side. It is vital for building React applications as it includes npm (Node Package Manager), which we will use to install React and other dependencies.
Windows Installation
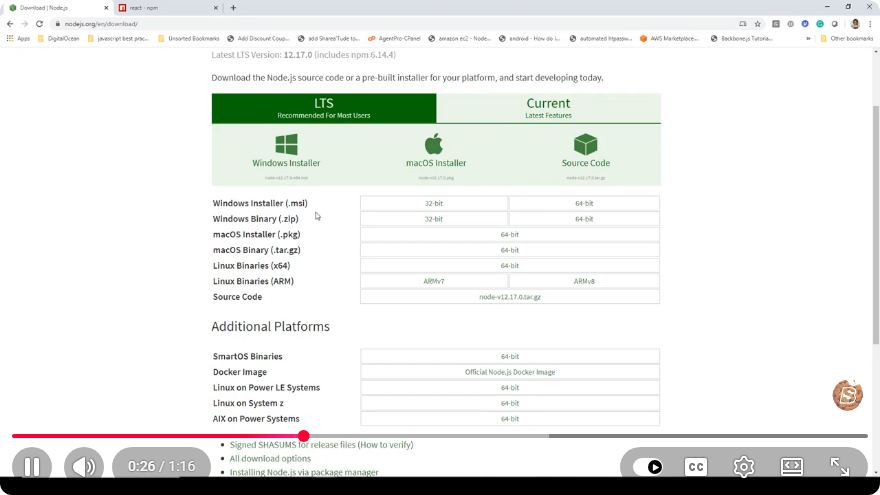
Download Node.js: Visit the Node.js official website and download the LTS version suitable for Windows.
Install Node.js: Run the downloaded installer and follow the installation wizard. Make sure to check the box that says "Automatically install the necessary tools" to set up the environment correctly.
Verify Installation: Open Command Prompt and type the following commands to check if Node.js and npm are installed correctly:
node -v
npm -v
You should see the version numbers displayed, which confirms successful installation.
macOS Installation
Using Homebrew: If you have Homebrew installed, you can easily install Node.js by running:
brew install nodeVerify Installation: Similar to Windows, check the installation using:
node -v
npm -v
Linux Installation
For Linux users, you can install Node.js using the package manager specific to your distribution. For Ubuntu, for instance:
sudo apt update
sudo apt install nodejs npm
Verify Installation
Again, use the same commands as above to confirm that Node.js and npm are installed correctly.
Step 2: Setting Up a New React Project
Now that Node.js is installed, we can create a new React application using Create React App, a comfortable environment for building React applications.
Create a New React App
Open your terminal or command prompt.
Navigate to the directory where you want to create your project:
cd path/to/your/directoryUse the Create React App command to set up a new application (replace
my-appwith your desired project name):npx create-react-app my-appThis command may take a few minutes as it downloads and installs the necessary packages.
Starting the Development Server
Once the installation is complete, navigate into your project folder:
cd my-app
Now, start the development server:
npm start
Your default web browser should open automatically and display your new React application at http://localhost:3000.
Step 3: Connecting to Azure Cosmos DB
To manage data effectively in your React application, Azure Cosmos DB offers a powerful NoSQL database service. Here’s how you can set it up.
Create an Azure Cosmos DB Account
Sign in to Azure: Go to the Azure Portal and log in.
Create a New Resource: Click on "Create a resource" and search for "Azure Cosmos DB."
Choose API: Select the API that best fits your use case (e.g., SQL API for document-based data).
Fill in the Details: Enter the required information such as account name, subscription, resource group, and location.
Review and Create: Click on the "Review + create" button and then "Create" after ensuring all details are correct.
Getting Connection String
Once your Cosmos DB account is created, navigate to the "Keys" section in the left sidebar.
Copy the "Primary Connection String" to use in your React application.
Step 4: Using Cosmos DB in Your React App
Now that you have your React app and Cosmos DB set up, you can start using them together. Below is a basic example of how to connect to Cosmos DB from your React application.
Install Axios: To make HTTP requests, you can use Axios. Install it using npm:
npm install axiosCreate a Service to Handle Database Operations: In your React app, create a new file named
cosmosService.js:import axios from 'axios'; const endpoint = 'YOUR_COSMOS_DB_ENDPOINT'; // Replace with your endpoint const key = 'YOUR_COSMOS_DB_KEY'; // Replace with your key const fetchItems = async () => { const response = await axios.get(`${endpoint}/items`, { headers: { 'Authorization': key, 'Content-Type': 'application/json' } }); return response.data; }; export { fetchItems };Use the Service in Your Component: In your
App.jsor any other component, you can import and use the service to fetch data.import React, { useEffect, useState } from 'react'; import { fetchItems } from './cosmosService'; const App = () => { const [items, setItems] = useState([]); useEffect(() => { const getData = async () => { const data = await fetchItems(); setItems(data); }; getData(); }, []); return ( <div> <h1>Items from Cosmos DB</h1> <ul> {items.map(item => ( <li key={item.id}>{item.name}</li> ))} </ul> </div> ); }; export default App;
Conclusion
Congratulations! You have now set up a basic React application and connected it to Azure Cosmos DB. This tutorial provided you with the foundational steps to kickstart your journey into web application development using React and Cosmos DB.
Feel free to expand on this foundation by adding features such as CRUD operations, authentication, and more. Happy coding!
Connect with SkillBakery Studios
Explore more tutorials, tools, and resources:
Posted by SkillBakery Studios


 Hello, my name is Jack Sparrow. I'm a 50 year old self-employed Pirate from the Caribbean.
No comments:
Post a Comment