
Lecture-8: Build Your First MCP Client | Connect to an MCP Server, List Tools & Call Them
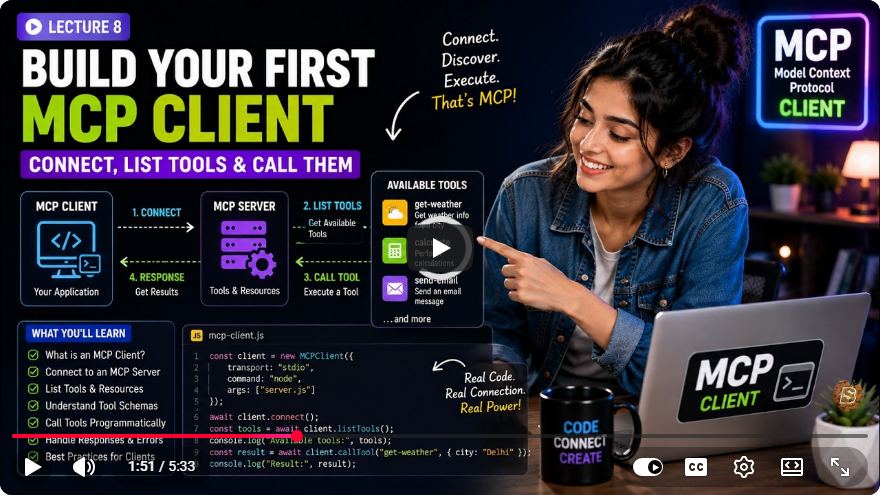
Building Your First MCP Client: A Step-by-Step Guide
In this tutorial, we will guide you through building a simple MCP (Multi-Channel Protocol) client using Node.js. By the end of this guide, you'll have a fully functional client that connects to an MCP server, lists its tools and resources, and calls them effectively.
What is an MCP Client?
Before we dive into the code, let's clarify what an MCP client is. In the MCP architecture:
- Host: The application that the user interacts with, such as a web app built with React.
- Client: The component within the host that communicates with the MCP server.
- Server: The backend application that exposes various tools and resources to the client.
The MCP client is responsible for connecting to the server, performing an initialization handshake, discovering available tools and resources, calling those tools, and reading resources on behalf of the user or AI.
Prerequisites
To follow along with this tutorial, ensure you have:
- Node.js installed on your machine.
- An existing MCP server (as built in previous lessons).
Setting Up the Project
Create a New Project Folder:
Navigate to your desired directory and create a new project for the MCP client. For example:
mkdir mcp-nodes-tasks-client
cd mcp-nodes-tasks-client
Initialize the Project:
Run the following command to create a new Node.js project:
npm init -yInstall Required Packages:
Make sure you install the necessary packages for your project. This typically includes the MCP client library and any other dependencies you may need:
npm install mcp-clientCreate the Main File:
Create an
index.tsxfile in your project directory:touch index.tsx
Writing the MCP Client Code
Now that the project is set up, let’s write the code for the MCP client.
Importing Required Modules
At the top of your index.tsx file, import the necessary modules:
import { Client, StdioClientTransport } from 'mcp-client';
Setting Up the Client
In the main method, you'll need to create the MCP client, establish a connection with the server, and perform a handshake:
console.log('Starting MCP client');

// Creating a new client instance
const client = new Client({
    name: 'MCP Client',
    version: '1.0',
    transport: new StdioClientTransport()
});

// Connecting to the server
client.connect().then(() => {
    console.log('Connected to MCP server');

    // List available tools
    client.listTools().then(tools => {
        tools.forEach(tool => {
            console.log(`Tool: ${tool.name} - ${tool.description}`);
        });
    });

    // List available resources
    client.listResources().then(resources => {
        resources.forEach(resource => {
            console.log(`Resource: ${resource.uri}`);
        });
    });
});
Calling Tools and Reading Resources
Once connected, you can call tools and read resources. Below is an example of how to call the listTasks tool:
client.callTool('listTasks').then(result => {
    console.log('Tasks:', result);
});

// Calling the addTask tool with arguments
const newTask = { title: 'New Task', description: 'Task Description' };
client.callTool('addTask', newTask).then(response => {
    console.log('Task created successfully:', response);
});

// Reading a resource
client.readResource('uri-to-resource').then(resourceData => {
    console.log('Resource Data:', resourceData);
});
Closing the Connection
Finally, ensure you clean up the connection once your operations are complete:
client.close().then(() => {
    console.log('Client finished. Connection closed.');
});
Running Your MCP Client
To run your MCP client, you can execute the following command in your terminal:
npm start
You should see the following output:
Starting MCP client
Connected to MCP server
Tool: listTasks - Lists all tasks
Tool: addTask - Adds a new task
Resource: uri-to-resource
Tasks: [List of tasks]
Task created successfully
Client finished. Connection closed.
Conclusion
In this tutorial, we've covered how to build a simple MCP client that connects to an MCP server, lists its tools and resources, and interacts with them effectively. You've learned how to set up your client project, establish a connection, call tools, and read resources.
In real-world applications, your MCP client would typically be integrated into a larger host application, such as a web dashboard or bot interface. As you progress, you can explore further enhancements to your client, such as error handling, user input, and more advanced features.
If you found this guide helpful, please share it and subscribe for more tutorials!
Connect with SkillBakery Studios
Explore more tutorials, tools, and resources:
Posted by SkillBakery Studios


 Hello, my name is Jack Sparrow. I'm a 50 year old self-employed Pirate from the Caribbean.
No comments:
Post a Comment